OAuth 2.0 Device Code Flow
Before starting to read this page, we invite you to check if this is the best authentication method for you. Please check the flowchart you can find on the Authentication page before proceeding.
Currently, the OAuth 2.0 Device Code Flow is not generally available; this means that you'll not be able to enable it from the Fatture in Cloud page, and that we're currently enabling it on demand for very specific use cases that cannot use the other authentication flows. Please, contact us if you think you should use this flow.
The OAuth 2.0 Device Code Flow is the recommended method to retrieve an Access Token for applications that can't use the OAuth 2.0 Authorization Code Flow because they are based only on a public (e.g. mobile or browser-based) client and don't have an associated backend. If you think this is not your case, then please check the Authentication page to check the other methods supported by our app.
This guide describes our implementation of the OAuth 2.0 Device Code flow. If you are interested in a more general explanation of this concept, please refer to the dedicated page.
To interact with our API on behalf of the user using this flow, it is necessary to implement the steps explained below.
Some open-source OAuth 2.0 libraries are available for each programming language. Those libraries take care of some of the following steps for you, so feel free to choose the one that you prefer to help you with the OAuth implementation.
In the last section of this page, you can find a non-exhaustive list of the available frameworks for each of the programming languages, but some others may be available.
🔑 Token types
Here's a quick reminder of the four tokens that we'll obtain in the following steps. All of the tokens are pseudo casual strings with a specific prefix that can be used to discern each one of the tokens; every token has a specific purpose and a lifespan (e.g. an expiration time) that define its validity. The User Code is slightly different, because of its nature (it must be human-readable) and because it is always coupled to a single Device Code (so they share the same lifespan).
| Token Name | Description | Prefix | Lifespan |
|---|---|---|---|
| Device Code | This is the code that identifies your request. You will use it to require the token while waiting for user approval. | d/ | 5 minutes (from its emission) |
| User Code | This is the code the user will need to insert into the Verification Page. Since it must be human-readable, it is shorter than the other tokens and has no prefix. | The same of the Device Code | |
| Access Token | This is the token you will use to make requests. | a/ | 24 hours (from its emission) |
| Refresh Token | This is the token you will use only to make refresh requests to obtain a new Access Token when the old one expires, without having to ask the user to give a new explicit authorization. When it expires it is necessary to perform this flow again from step 1. | r/ | 1 year (from the last refresh request) |
0️⃣ Prerequisites: Create an app and retrieve the credentials
The Device Code flow requires specific credentials, that are specific to a single application. You can create an app following this guide: Create an app.
Since the Device Code Flow isn't generally available, the page doesn't let you to select this flow. For now, just enable the OAuth 2.0 flow. To enable it, you need to specify the Redirect URL, but since in the Device Code Flow we won't need it, you can just put in any valid URL (for example "http://localhost:8080").
The page will show you the Client ID and Client Secret parameters; for the Device Code Flow you'll just need the Client ID. Just ignore the Client Secret.
🙋♂️ Can you please enable our app?
Once created the app, you'll need to contact our team requesting to enable the Device Code Flow on it. As already said, at this moment we don't provide the possibility to enable it automatically from the Fatture in Cloud page.
In your request, you'll need to:
- Explain why your use case requires the Device Code Flow
- Attach your application's ID
The app ID can be found on the URL of the Fatture in Cloud page of the app. The ID is the numeric part at the end of the URL.
For example, for this URL the ID is "1113":
https://secure.fattureincloud.it/settings-developers-1113
If you want to use different applications for DEV and PROD, you should require enablement for both applications. The PROD app will most probably require to be public, while the DEV app can stay private. Check out here for a more detailed explanation.
1️⃣ Retrieve the Device Code
This authentication flow is initiated by requesting a Device Code, that will be used to perform the next steps.
To require it, you must perform a POST HTTP call to the https://api-v2.fattureincloud.it/oauth/device endpoint.
The parameters required for the request are the following:
| Parameter name | Description |
|---|---|
| client_id | Your Client ID, e.g. the identifier of your app. You can find it on your Fatture in Cloud application page (see the previous step). |
| scope | A space-separated list of permissions you are asking for your app. See the Scopes page for further information. |
The parameters must be sent in the JSON body of the request.
The cURL command will look like this:
- cURL
curl --request POST \
     --url https://api-v2.fattureincloud.it/oauth/device \
     --header 'Accept: application/json' \
     --header 'Content-Type: application/json' \
     --data '
{
  "client_id": "CLIENT_ID",
  "scope": "situation:r settings:a"
}
'
The response body will be similar to the following:
{
  "device_code": "d/eyJhbGciOiJIUzI1NiIsInR5cCI6IkpXVCJ9.eyJzdWIiOiIxMjM0NTY3ODkwIiwibmFtZSI6IlN0cmF3IEhhdCBMdWZmeSBpcyBDb29sISEhIiwiaWF0IjoxNTE2MjM5MDIyfQ.WVPYQ6QwsLd1GmtnFij-1MbdhPUVxyCfiAC57kBQKk4",
  "user_code": "NYNQ-LNGA",
  "scope": {
    "situation": "r",
    "settings": "a"
  },
  "verification_uri": "https://fattureincloud.it/connetti",
  "interval": 5,
  "expires_in": 300
}
The returned parameters are:
| Parameter name | Description |
|---|---|
| device_code | The Device Code. |
| user_code | The User Code. |
| scope | A representation of the scopes associated with this request. It should match the ones inserted in your request, you can just ignore it. |
| verification_uri | The URI where the verification page is hosted. |
| interval | The number of seconds that must pass between two Token Requests. |
| expires_in | The validity of the Device Code in seconds before its expiration. |
2️⃣ Ask the User Intervention
At this point, you must explain to the user how to grant you the permission.
You should show the User Code and the Verification URI on your plugin page, in a way similar to this one:
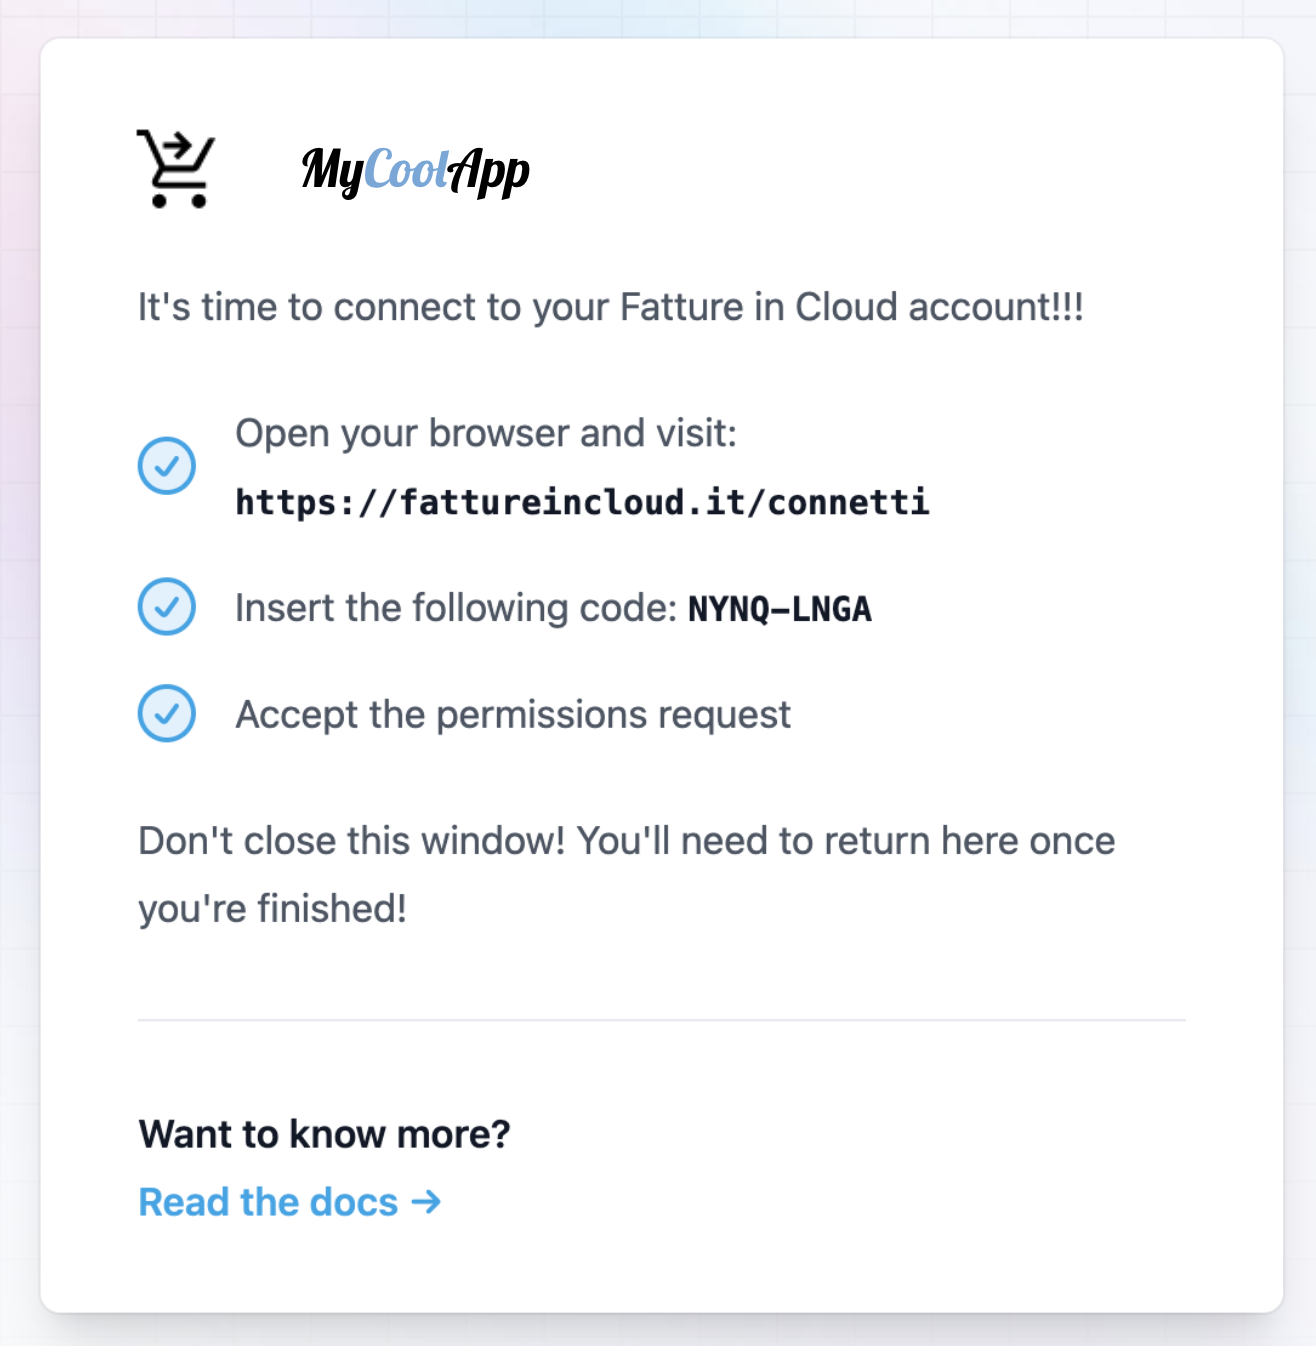
The Device Code will be used by your plugin, you don't need to show it to the user.
Now the user should:
- Access the page indicated by our Verification URI
- Insert the User Code shown on your page
- Grant the permissions (related to the selected scopes)
- Return to your plugin page
The user should not close your plugin page. If the page is closed, you should restart the flow from step one. You could ask him to open a browser and write the URL by hand, or you could provide a dedicated button to open the page in a new window. You decide.
3️⃣ Obtain the Access Token
The Device Code obtained above has only one purpose: to exchange it with an Access Token.
While the user is performing the validation step on the Fatture in Cloud page, your plugin should start polling to try retrieving the Access Token from our APIs (and that's why the user shouldn't close the page). Your integration should start requesting the token to our APIs every few seconds until it is able to retrieve the Access Token or it gets a definitive error. This process should be executed in the background, and it should be transparent to the user.
The request to retrieve the token is a POST HTTP call to the https://api-v2.fattureincloud.it/oauth/token endpoint.
The parameters required for the request are the following (they must be put in the JSON body of the request):
| Parameter name | Description |
|---|---|
| grant_type | Must be set to "urn:ietf:params:oauth:grant-type:device_code". This indicates that you want to exchange a Device Code for an Access Token. |
| client_id | Your Client ID, e.g. the identifier of your app. You can find it on your Fatture in Cloud application page (see the previous steps). |
| device_code | The Device Code you retrieved in the previous steps. |
The cURL command will look like this:
- cURL
curl --request POST \
     --url https://api-v2.fattureincloud.it/oauth/token \
     --header 'Accept: application/json' \
     --header 'Content-Type: application/json' \
     --data '
{
  "grant_type": "urn:ietf:params:oauth:grant-type:device_code",
  "client_id": "CLIENT_ID",
  "device_code": "d/eyJhbGciOiJIUzI1NiIsInR5cCI6IkpXVCJ9.eyJzdWIiOiIxMjM0NTY3ODkwIiwibmFtZSI6IlN0cmF3IEhhdCBMdWZmeSBpcyBDb29sISEhIiwiaWF0IjoxNTE2MjM5MDIyfQ.WVPYQ6QwsLd1GmtnFij-1MbdhPUVxyCfiAC57kBQKk4"
}
'
This request could obtain two different results.
In most cases, your requests will obtain a 400 Bad Request error response.
In this case, the response body will be similar to the following:
{
  "error": "authorization_pending",
  "error_description": "There was an error during authentication."
}
The error field explains what happened, and defines your next action. Here you can find the list of the errors you could encounter:
| Error Message | Description | Definitive Error | Next Action |
|---|---|---|---|
| authorization_pending | The request was legit, but the user didn't complete the validation step yet. | No | Retry again after the interval |
| slow_down | Your code is polling too frequently, you should wait a little more. | No | Retry again, but wait a little more |
| access_denied | The user completed the validation step but refused to grant the permissions. | Yes | You should restart the flow from step one |
| expired_token | The user didn't complete the validation step in time, and the Device Code expired. | Yes | You should restart the flow from step one |
If the error is definitive, it means the flow failed and you should restart the flow from scratch. A not definitive error instead is temporary, and you can retry again later with the same Device Code. Please keep in mind that you must wait a certain time between two requests, otherwise you'll obtain a "slow_down" error.
When the user completed the validation step by granting the required permissions, the next request will finally obtain a 200 OK response. In this case, the response will contain the tokens needed, and your plugin will finally be able to interact with our APIs.
The success response body will be similar to the following:
{
  "token_type": "bearer",
  "access_token": "a/eyJ0eXAiOiJKV1QiLCJhbGciOiJIUzI1NiJ9.eyJyZWYiOiJTQzJLSlRpTjVXTTBORFR0SWd2Y1o4cmhFR1ZrdmFjRiIsImV4cCI6MTU4OTY0MDk3M30.DNG4jX8Au3WMxVtb06RUNi0Dj5cDylagpZPgDLhpIhY",
  "refresh_token": "r/eyJ0eXAiOiJKV1QiLCJhbGciOiJIUzI1NiJ9.eyJyZWYiOiJxaDh4bXJMM0Y0SHExWU1RSDRhcHhWTVdDR2t0SktsdiJ9.IXEqUdfQjlR6EWas1QeCzpqd8O08usvJHaMYbjwVdWY",
  "expires_in": 86400
}
The returned parameters are:
| Parameter name | Description |
|---|---|
| token_type | Set as "bearer", it indicates how to use the returned token in the following REST calls. |
| access_token | The Access Token. |
| refresh_token | The Refresh Token. |
| expires_in | The validity of the Access Token in seconds before its expiration. |
As you can see, the REST call will return the Access Token and the Refresh Token. The Access Token can be used to perform multiple API requests, but it expires after a certain amount of time. The Refresh Token instead can be used to obtain a new Access Token once the previous one is expired; it also expires, but its lifespan is higher than the Access Token one.
Now you can use the Access Token to interact with the Fatture in Cloud API. In the next section, you'll see how to use it to perform a request.
The Access Token (and by extension the Refresh Token) makes it possible to perform operations on the Fatture in Cloud API on behalf of the user, thus your application will be able to read and modify the user's own resources. This means that the tokens are a precious resource that must be protected.
💼 Find your Company ID
Even if this step is not strictly part of the Authentication process, it is required to be able to use the Company-scoped Methods. Once you obtain the Access Token, you can use the List User Companies method to retrieve the ID of the related Company; please check the Company-scoped Methods page for further info.
✅ Perform an API request
A valid Access Token can be used to authorize requests included in the scopes authorized by the user at step one; to obtain a valid response it is necessary to include the Access Token in your request as an HTTP header.
In the following example, we'll simulate a Get Supplier call. We choose this method because it is relatively easy to understand and it requires the entity.suppliers:r scope to be authorized correctly.
Please, notice that for the purposes of this example we will assume that we already know the parameters required by the request and that we have previously acquired a valid Access Token performing the steps above.
- cURL
- HTTP
curl --request GET \
     --url https://api-v2.fattureincloud.it/c/17/entities/suppliers/16 \
     --header 'Accept: application/json'
     --header 'Authorization: Bearer a/eyJ0eXAiOiJKV1QiLCJhbGciOiJIUzI1NiJ9.eyJyZWYiOiJZMElqc1pVWEpUZkxCSkZ3aG5iZmpSYTRJRktYTDk3ayIsImV4cCI6MTU4OTY0MjAzMX0.qn869ICUSS3_hx84ZTToMsB5slWQZjGZXGklSIiBkB4'
GET /c/17/entities/suppliers/16 HTTP/1.1
Host: api-v2.fattureincloud.it
Accept: application/json
Authorization: Bearer a/eyJ0eXAiOiJKV1QiLCJhbGciOiJIUzI1NiJ9.eyJyZWYiOiJZMElqc1pVWEpUZkxCSkZ3aG5iZmpSYTRJRktYTDk3ayIsImV4cCI6MTU4OTY0MjAzMX0.qn869ICUSS3_hx84ZTToMsB5slWQZjGZXGklSIiBkB4
The corresponding code is the following:
- C#
- Go
- Java
- JavaScript
- PHP
- Python
- Ruby
- TypeScript
// this code uses RestSharp Client: https://restsharp.dev
// you can install it with the following command:
// dotnet add package RestSharp

using System;
using RestSharp;

namespace restclient
{
    class Program
    {
        static void Main(string[] args)
        {
            // for this example we define the token as string, but you should have obtained it in the previous steps
            // the token is valid for the "received_documents:r" scope needed to perform this operation
            var token = "a/eyJ0eXAiOiJKV1QiLCJhbGciOiJIUzI1NiJ9.eyJyZWYiOiJZMElqc1pVWEpUZkxCSkZ3aG5iZmpSYTRJRktYTDk3ayIsImV4cCI6MTU4OTY0MjAzMX0.qn869ICUSS3_hx84ZTToMsB5slWQZjGZXGklSIiBkB4";

            // these parameters are usually retrieved through our APIs or stored in a DB
            var companyId = 16;
            var supplierId = 17;

            var url = "https://api-v2.fattureincloud.it/c/" + companyId  + "/entities/suppliers/" + supplierId,;

            var client = new RestClient(url);
            var request = new RestRequest(Method.GET);

            request.AddHeader("authorization", "Bearer " + token);
            IRestResponse response = client.Execute(request);
            Console.Write(response.Content.ToString());
        }
    }
}
package main

import (
	"io/ioutil"
	"log"
	"net/http"
)

func main() {

	// for this example we define the token as string, but you should have obtained it in the previous steps
	token := "Bearer " + "a/eyJ0eXAiOiJKV1QiLCJhbGciOiJIUzI1NiJ9.eyJyZWYiOiJZMElqc1pVWEpUZkxCSkZ3aG5iZmpSYTRJRktYTDk3ayIsImV4cCI6MTU4OTY0MjAzMX0.qn869ICUSS3_hx84ZTToMsB5slWQZjGZXGklSIiBkB4"

	// these parameters are usually retrieved through our APIs or stored in a DB
	companyId := "16"
	supplierId := "17"
	uri := "http://api-v2.local.fattureincloud.it/c/" + companyId + "/entities/suppliers/" + supplierId

	req, _ := http.NewRequest("GET", uri, nil)
	req.Header.Add("Authorization", token)

	client := &http.Client{}
	resp, err := client.Do(req)
	if err != nil {
		log.Println("Error on response.\n[ERROR] -", err)
	}
	defer resp.Body.Close()

	body, err := ioutil.ReadAll(resp.Body)
	if err != nil {
		log.Println("Error while reading the response bytes:", err)
	}
	log.Println(string([]byte(body)))

}
import okhttp3.HttpUrl;
import okhttp3.OkHttpClient;
import okhttp3.Request;
import okhttp3.Response;
import java.io.IOException;
import java.net.URL;

public class Application {
    public static void main(String[] args) throws IOException {

        // for this example we define the token as string, but you should have obtained it in the previous steps
        String token = "a/eyJ0eXAiOiJKV1QiLCJhbGciOiJIUzI1NiJ9.eyJyZWYiOiJZMElqc1pVWEpUZkxCSkZ3aG5iZmpSYTRJRktYTDk3ayIsImV4cCI6MTU4OTY0MjAzMX0.qn869ICUSS3_hx84ZTToMsB5slWQZjGZXGklSIiBkB4";

        // these parameters are usually retrieved through our APIs or stored in a DB
        Integer companyId = 16;
        Integer supplierId = 17;

        URL url = new HttpUrl.Builder()
                .scheme("https")
                .host("api-v2.fattureincloud.it")
                .addPathSegments("c/" + companyId  + "/entities/suppliers/" + supplierId)
                .build().url();

        OkHttpClient client = new OkHttpClient();
        Request request = new Request.Builder()
                .header("Authorization", "Bearer " + token)
                .url(url)
                .build();
        Response response = client.newCall(request).execute();
        System.out.println(response.body().string());
    }
}
var http = require("https");

// for this example we define the token as string, but you should have obtained it in the previous steps
// the token is valid for the "received_documents:r" scope needed to perform this operation
var token =
  "a/eyJ0eXAiOiJKV1QiLCJhbGciOiJIUzI1NiJ9.eyJyZWYiOiJZMElqc1pVWEpUZkxCSkZ3aG5iZmpSYTRJRktYTDk3ayIsImV4cCI6MTU4OTY0MjAzMX0.qn869ICUSS3_hx84ZTToMsB5slWQZjGZXGklSIiBkB4";

// these parameters are usually retrieved through our APIs or stored in a DB
var companyId = 16;
var supplierId = 17;

var options = {
  method: "GET",
  hostname: "api-v2.fattureincloud.it",
  port: null,
  path: "/c/" + companyId + "/entities/suppliers/" + supplierId,
  headers: {
    authorization: "Bearer " + token,
  },
};

var req = http.request(options, function (res) {
  var chunks = [];

  res.on("data", function (chunk) {
    chunks.push(chunk);
  });

  res.on("end", function () {
    var body = Buffer.concat(chunks);
    console.log(body.toString());
  });
});

req.end();
// this code uses Guzzle HTTP Client: https://docs.guzzlephp.org/en/stable/
// and also ext-json
// you can install them with the following command:
// composer require guzzlehttp/guzzle ext-json
use GuzzleHttp\Client;
use GuzzleHttp\Exception\ClientException;
use GuzzleHttp\Psr7;


// for this example we define the token as string, but you should have obtained it in the previous steps
// the token is valid for the "entity.suppliers:r" scope needed to perform this operation
$token = 'a/eyJ0eXAiOiJKV1QiLCJhbGciOiJIUzI1NiJ9.eyJyZWYiOiJZMElqc1pVWEpUZkxCSkZ3aG5iZmpSYTRJRktYTDk3ayIsImV4cCI6MTU4OTY0MjAzMX0.qn869ICUSS3_hx84ZTToMsB5slWQZjGZXGklSIiBkB4';

// these parameters are usually retrieved through our APIs or stored in a DB
$companyId = 17;
$supplierId = 16;

$client = new Client();

$url = "https://api-v2.fattureincloud.it/c/$companyId/entities/suppliers/$supplierId";

try {
  $response = $client->request('GET', $url, [
    'headers' => [
      'Accept' => 'application/json',
      'Authorization' => 'Bearer ' . $token,
    ],
  ]);

    return json_decode((string) $response->getBody());
} catch (ClientException $e) {
    echo Psr7\Message::toString($e->getRequest());
    echo Psr7\Message::toString($e->getResponse());
}
import requests

# for this example we define the token as string, but you should have obtained it in the previous steps
# the token is valid for the "received_documents:r" scope needed to perform this operation
token = "a/eyJ0eXAiOiJKV1QiLCJhbGciOiJIUzI1NiJ9.eyJyZWYiOiJYOGxDaFR4dHVsQkx0cXVVSjNCQlZEME1KOVY0NTl3QiIsImV4cCI6MTYzOTcyODAzM30.A-uMzLDpaEzGRqzUodJfdJPKo8SWMCytWUElQdOEP0c"

# these parameters are usually retrieved through our APIs or stored in a DB
company_id = 16
supplier_id = 17

url = f"https://api-v2.fattureincloud.it/c/\{company_id\}/entities/suppliers/{supplier_id}"
headers = { 'authorization': "Bearer " + token }
response = requests.get(url, headers=headers)

print(response.json())
require 'uri'
require 'net/http'

# for this example we define the token as string, but you should have obtained it in the previous steps
# the token is valid for the "received_documents:r" scope needed to perform this operation
token = "a/eyJ0eXAiOiJKV1QiLCJhbGciOiJIUzI1NiJ9.eyJyZWYiOiJYOGxDaFR4dHVsQkx0cXVVSjNCQlZEME1KOVY0NTl3QiIsImV4cCI6MTYzOTcyODAzM30.A-uMzLDpaEzGRqzUodJfdJPKo8SWMCytWUElQdOEP0c"

# these parameters are usually retrieved through our APIs or stored in a DB
company_id = 16
supplier_id = 17

uri = URI("https://api-v2.fattureincloud.it/c/#\{company_id\}/entities/suppliers/#{supplier_id}")
headers = { authorization: "Bearer " + token}
res = Net::HTTP.get_response(uri, headers)

puts res.body
// in this example we are using the node-fetch library to make the request
import fetch, { Headers } from "node-fetch";

// for this example we define the token as a string, but you should have obtained it in the previous steps
var token =
  "a/eyJ0eXAiOiJKV1QiLCJhbGciOiJIUzI1NiJ9.eyJyZWYiOiJYOGxDaFR4dHVsQkx0cXVVSjNCQlZEME1KOVY0NTl3QiIsImV4cCI6MTYzOTcyODAzM30.A-uMzLDpaEzGRqzUodJfdJPKo8SWMCytWUElQdOEP0c";

// these parameters are usually retrieved through our APIs or stored in a DB
var companyId = 16;
var supplierId = 17;

var headers = new Headers({
  "Content-Type": "application/json",
  Authorization: "Bearer " + token,
});

var options = {
  method: "GET",
  headers: headers,
};

try {
  var res = await fetch(
    "https://api-v2.fattureincloud.it/c/" +
      companyId +
      "/entities/suppliers" +
      supplierId,
    options,
  );
  var json = await res.json();
  console.log(json);
} catch (err) {
  console.log(err);
}
If the Access Token is valid and provided correctly in the header, the response will be a 200 OK. To check the possible error responses, please check the dedicated page.
♻️ Refreshing the token
When the Access Token expires, you have two options to keep performing authenticated requests:
- Obtain a new one performing all the previous steps
- Obtain a new one using the Refresh Token
Please, note that the first option once again requires user interaction, so we suggest performing it again only when the Refresh Token is expired.
Similar to what happens in step 3, you can obtain a new token with a POST HTTP call to the https://api-v2.fattureincloud.it/oauth/token endpoint.
The parameters required for the request are the following:
| Parameter name | Description |
|---|---|
| grant_type | Must be set to "refresh_token". This indicates that you want to exchange a Refresh Token for an Access Token. |
| client_id | Your Client ID, e.g. the identifier of your app. You can find it on your Fatture in Cloud application page (see above). |
| refresh_token | The Refresh Token obtained previously. |
The cURL command will look like this:
- cURL
curl --request POST \
     --url https://api-v2.fattureincloud.it/oauth/token \
     --header 'Accept: application/json' \
     --header 'Content-Type: application/json' \
     --data '
{
  "grant_type": "refresh_token",
  "client_id": "CLIENT_ID",
  "refresh_token": "r/eyJ0eXAiOiJKV1QiLCJhbGciOiJIUzI1NiJ9.eyJyZWYiOiJxaDh4bXJMM0Y0SHExWU1RSDRhcHhWTVdDR2t0SktsdiJ9.IXEqUdfQjlR6EWas1QeCzpqd8O08usvJHaMYbjwVdWY"
}
'
The response body will be similar to the following:
{
  "token_type": "bearer",
  "access_token": "a/eyJ0eXAiOiJKV1QiLCJhbGciOiJIUzI1NiJ9.eyJyZWYiOiJZMElqc1pVWEpUZkxCSkZ3aG5iZmpSYTRJRktYTDk3ayIsImV4cCI6MTU4OTY0MjAzMX0.qn869ICUSS3_hx84ZTToMsB5slWQZjGZXGklSIiBkB4",
  "refresh_token": "r/eyJ0eXAiOiJKV1QiLCJhbGciOiJIUzI1NiJ9.eyJyZWYiOiJRUWVwVUgxOFJwY05oN0hoR0g4Rmsxd3BnZUFOSHBBMiJ9.dkStK6xIY-wgjwdQZZF5rrjH_tfLr4BB4dfGB7zuLO8",
  "expires_in": 86400
}
The returned parameters are:
| Parameter name | Description |
|---|---|
| token_type | Set as "bearer", it indicates how to use the returned token in the following REST calls. |
| access_token | The Access Token. |
| refresh_token | The Refresh Token. |
| expires_in | The validity of the Access Token in seconds before its expiration. |
The obtained token can be used exactly as explained in step 3 of this guide.
📝 Change Token permissions
Unfortunately, if you need to change the set of permissions that you are currently requiring from your app users, you can't do it by preserving the old token: you must discard the old token on your code and replace it with a new one obtained after updating the scopes list at Step 1.
📚 OAuth 2.0 libraries
Here you can find a useful non-exhaustive list of OAuth 2.0 Client libraries for different programming languages. You can use them to take care of some of the tedious tasks in this guide for you, such as the retrieval of the Access Token. Feel free to choose the one that best fits your needs. It is important to notice though that the Device Code flow isn't so widely used yet, so many of the libraries could just ignore this flow.